User manual
Miniature laboratory power supply - USB 2.0 siru.box® 2.5W
Table of contents

Please read these instructions completely before using the appliance. If you pass the device on to someone else, make sure that the link to the instructions is also passed on.


WEEE-Reg.-No. DE 39899127
1. Description and function
The siru.box® 2.5W is a high-quality miniature laboratory power supply unit that is only supplied with power via the USB 2.0 connection. It has constant voltage and constant current operation. It is operated via a local website, which is provided via a web server in the device itself. After plugging in the device, the control website can be accessed with any web browser via the path http://siru.box (Windows operating systems only) or http://10.0.0.10. The address 10.0.0.10 corresponds to the standard configuration on delivery and can be adapted by the user and then be different.
1.1 Function and equipment
- 0-15V, 0-600mA, maximum 2.5W output power
- Limitation of the output power to 2.5W according to USB 2.0 specification
- Precise adjustment of current and voltage (10 mV/ 1 mA)
- Constant voltage and constant current operation
- Operating controller current and voltage lockable
- Current and voltage setting range limitable
- Integrated web server with control website
- Remote control via Rest API
- Device software can be updated
2. Intended use
Use is only permitted in a dry, dust-free environment with adequate ventilation. Only use in dry indoor areas! Use is not permitted in potentially explosive atmospheres.
Failure to observe these regulations and safety instructions can lead to accidents and damage. Any use not described in these operating instructions is not permitted and will invalidate the guarantee and warranty and exclude liability. This also applies to unauthorized modifications and conversions.
3. Safety instructions, service and operating instructions
- Observe the terms of use listed in chapter 2. Disregarding this can lead to accidents, property damage and personal injury.
- This appliance is not intended for use by persons with reduced physical, sensory or mental capabilities (including children) or lack of experience and knowledge, unless they have been given supervision or instruction concerning use of the appliance by a person responsible for their safety.
- The appliance is not a toy and should not be used by children as it contains hot, small parts that can be swallowed and cables that pose a strangulation hazard.
- Do not leave packaging materials lying around, as they can pose a danger to children at play.
- Do not expose the device to extreme environmental conditions such as extreme heat or cold, direct sunlight, vibrations, mechanical influences, electromagnetic and magnetic fields, moisture or dust.
- Do not touch or operate the appliance with wet hands.
- Always ensure adequate ventilation.
- Never open the housing! In the event of defects, malfunctions, mechanical damage or unexplained functional problems, take the appliance out of operation immediately and contact our service department for advice or repair.
- Please note the service information in our General Terms and Conditions and publications regarding the handling of services and technical advice.
4. Operating, connection and display elements
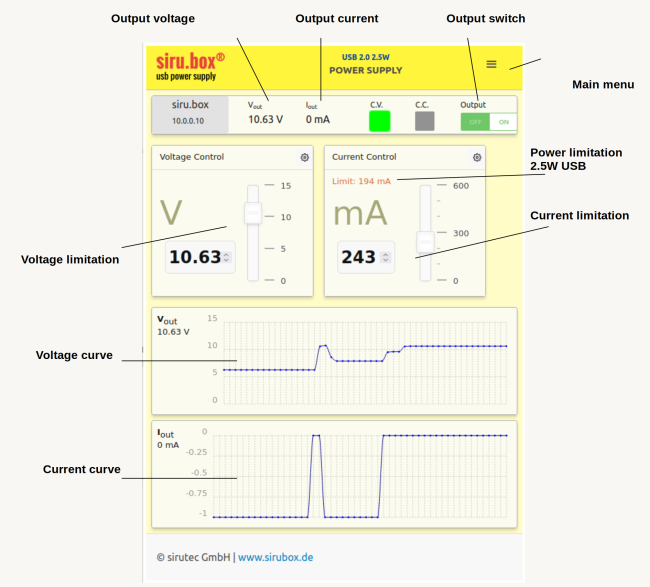
The device is operated exclusively via the device’s internal website using a web browser on a computer to which the device is connected via the USB connection.
4.1 Website for device control
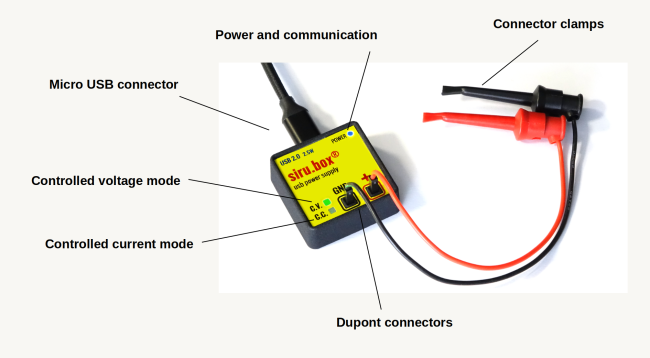
4.2 Connections and displays on the device
5. Commissioning and operation
5.1 Installation
Position the device so that sufficient air circulation is ensured and it is not exposed to a heat source (e.g. heating or direct sunlight) for long periods of time.
5.2 Commissioning
- Remove any connected load. This applies in particular to if it is unclear whether a start configuration has been activated, see the Start configuration section.
- Connect the device to the computer using the USB cable supplied.
- Open a web browser and connect to the device.
- Connect the load in the pole direction
- Activate the output via the ‘Output’ control panel via the web interface
5.3 Setting output values
- Set the desired values for output voltage and output current via the web interface.
- The device automatically switches between constant voltage and constant current mode during operation, which is indicated by the “CV/CC” displays. Initially, constant voltage mode (CV) is always active until the current drawn reaches the set current limit. As soon as this happens, the device limits the current and switches to constant current mode (CC). If the load current falls below the set limit again, the device switches back to CV mode.
5.4 Area limitation
The set values can be limited via the web interface. This prevents accidental adjustment.
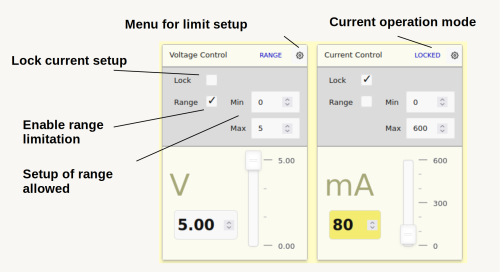
On the one hand, the currently set value can be fixed using the ‘Lock’ setting, and on the other hand, a possible setting range can be limited using the ‘Range’ option. The settings can be specified separately for voltage and current and are retained even after a restart.
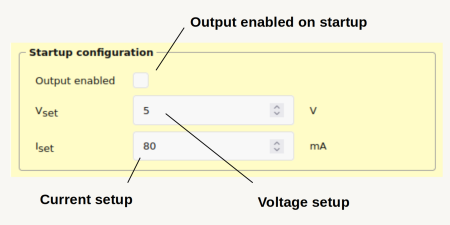
5.5 Start configuration
On delivery, the output of the device is deactivated after connecting via the USB cable. The voltage is set to 0V and the current to 0mA. A different start configuration can be defined via the menu/setup.
6. Update firmware
Due to error corrections, functional enhancements or adaptations to current operating systems, new firmware is provided that the user can manually install on the device.
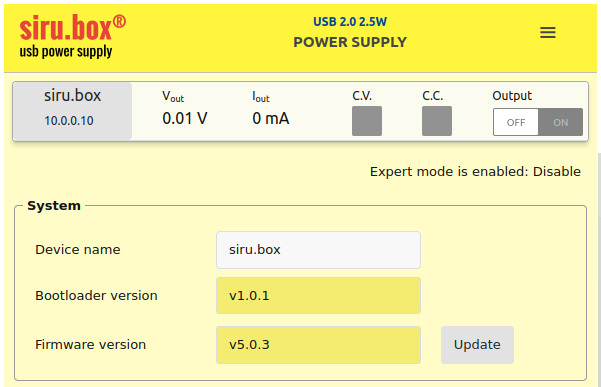
6.1 Displaying the currently installed version
- Open the configuration page via the drop-down menu at the top right by clicking on “Setup”.
- Activate expert mode by clicking on “Expert mode” in the top right-hand corner of the page.
- The bootloader version and the firmware version are displayed in the “System” area.
- Use the version displayed to check whether a more up-to-date version is available.
6.2 Installing new firmware
If new firmware is available, download it from http://sirubox.de/firmware and unzip it locally on your computer.
After you have pressed the ‘Update’ button and confirmed the ‘Start now?’ prompt with ‘Yes’, the device logs off from the computer and appears as a USB storage device (similar to a USB stick). As soon as the siru.box is ready and waiting for the new firmware to be copied, the red and green LEDs light up alternately.
The device is now ready for the new firmware file to be imported. Simply copy the file (file extension .bin) by drag & drop into the newly appeared drive.
Depending on the operating system, it may be necessary to ‘unmount’ the device in order to complete the copying process.
Note:
If the device is in update mode but no firmware update is installed, this mode remains active for 100 seconds. If the power is interrupted by unplugging and plugging in, the time of 100 seconds starts again. To switch back to normal operating mode, this time must be waited for.
Note:
If an update has been started but has been interrupted (e.g. due to an interruption in the power supply), the device can no longer switch to normal mode. Update mode then remains active until a complete firmware file has been uploaded.
As soon as the device has been restarted after the update, the updated firmware version can be checked via the device website. A firmware update can also include an update of the bootloader, so that both versions can be changed after an update.
7. Maintenance and care
- Store the device in a clean, cool and dry place.
- Only use a dry cotton cloth for cleaning. For more stubborn stains, the cleaning cloth can be lightly moistened with water.
- Do not use any cleaning agents or chemicals.
8. Technical data
| Input: | 5V / 0.5A MAX |
| Output voltage: | 0-15 V DC |
| Output current: | 0-600mA |
| Output power: | 2.5W MAX |
| Accuracy: | ±0.02V / ±2mA * |
| Resolution setting: | 0.01V / 1mA |
| Display resolution: | 0.01V / 1mA |
| Overload protection: | Current limiting and short-circuit proof |
| Ambient temperature: | 0 .. 40°C |
| Ambient humidity: | <90% R.H. |